Research Administrators – Reviewing and Approving a Proposal
Definitions
Pre-Review Route: The route that is initiated for every proposal. The pre-review information to be approved or determined includes F&A waiver request, cost sharing and F&A off-campus rate determination.
Final Route: The final route for approval after the proposal development record is completed. The final route includes departmental, college, associated centers, hub and central office review.
Approval: An indication that the reviewer accepts the information routed.
Disapproval: An indication that the individual does not approve of the pre-approval information or the submission of the proposal.
Conditionally Approve: An approval that is contingent upon a change that should be communicated in the comments section in the reviewer dashboard. Conditionally approving a route is recorded in the record as an APPROVAL.
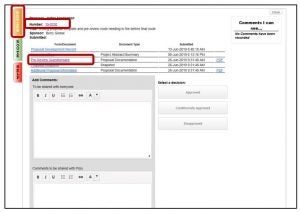
Reviewer Dashboard: The page that is populated for a reviewer with the attachments, pre-review information, additional proposal compliance information and a direct link to the proposal record. The approval, contingent approval or disapproval and comments are completed on this page.
How to review and approve a Pre-Approval Route
When a proposal is in your queue Outlook will receive an email and the notification will be shown on the eTRACS Messages widget/menu or the Assignments/Things to Do widget and menu.
- From Messages, Things to Do or Assignments, click on the proposal number that needs a pre-review approval
- Once the reviewer dashboard is opened
- The “Review Tab” allows the reviewer to open the pre-review questionnaire and any other attachments added thus far in proposal development
- The “Route” tab allows the reviewer to see the pre-review route and who has and will review this proposal
- The “Help” tab gives some general help information on how to review and approve
- The proposal link will take you to the proposal development record
- Open the Pre-Review Questions tab to review the information that needs approval
- Scroll down to see all of the questions displayed for each section

- After the review, navigate back to the Reviewer Dashboard > Add Comments > Approve, Conditionally Approve or Disapprove

- If a waiver or off-campus F&A rate is approved
- Navigate to the F&A tab of the budget of the record
- Update the base: MTDC or TCD
- Update the rate to an “Off-campus” rate OR choose “Manual Entry” > Type in the Rate > Save
- Ensure that “Off-Campus” is chosen on the Setup Questions tab

NOTE: If any pre-review matter is disapproved, the PI/proposal developer must adjust the answers to the pre-review questions according to the comments and disapproval and re-submit the pre-approval route.
How to review a Final Route and Submit a proposal
When a proposal is in your queue Outlook will receive an email and the notification will be shown on the eTRACS Messages menu. It will also appear as an Assignment or Thing to Do.
- Click on the proposal number from the Assignments widget or Things to Do menu
- Review all proposal tabs and components
- Approve the final proposal route on the Reviewer Dashboard
- Submit the proposal to the sponsor via the mechanism they require, or submit via System-to-System using the steps below
- Navigate to the Finalize tab > Click “Validation & Submission to Grants.gov” link at the bottom of the page and/or the orange XML Validation button.
- For NIH submissions, there will be a button for “NIH Pre-Submissions Validations”

-
- If errors are present, a pop-up window will appear > Click “Show Errors”

-
- Correct any errors that are presented
- When errors no longer are presented with an NIH Pre-Submission validation or XML Validation > Click Submit to Grants.gov

- A history of the statuses will appear in the Finalize tab and can be viewed at any time

- Navigate to the PT module for the related record
- Click on the “Status History” tab > Change the Status to “Submitted to Sponsor” > Click Add
