Pre-Proposal Development
Definitions
Pre-Proposal Submission of a project summary/concept paper/white paper required by the Proposal Sponsor which is intended to result in an invitation to submit a full proposal. May require an estimated cost or budget. Does not include a pre-submission “Letter of Intent” intended to assist the Proposal Sponsor in determining the number of proposals expected for a particular call or the number of reviewers that will be needed.
Pre-Proposal Template The eTRACS simplified proposal template used for pre-proposal development and routing.
Letter of Intent A document declaring intentions to submit a proposal to a given sponsor. A letter of intent does not require a detailed budget and/or scope of work and would not be developed and/or routed within eTRACS.
Final Proposal The full proposal to be submitted to the sponsor after a pre-proposal submission.
When to create and route a pre-proposal
A pre-proposal should only be routed if an initial budget and scope of work are required for pre-proposal submission.
Letters of intent (LOIs) will not be captured in eTRACS or routed for review/approval. The PI/PD is expected, as a courtesy, to notify his/her Hub Administrator, Department Chair and Associate Dean for Research when he/she submits a LOI to the sponsor.
Developing a Pre-Proposal
- Navigate to the Proposal Development module and click “Proposal” under the Create New section

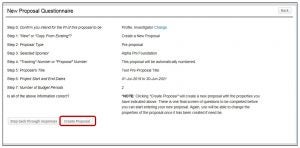
- New Proposal Questionnaire:
- Step 1 – Create New Proposal > Continue
- Step 1 Continued – Choose Setup Proposal Manually > Continue
- Step 2 – Select “Pre-Proposal” > Continue
- Step 3 – Type Sponsor Name > Continue
- Step 5 – Type Proposal Title > Continue
- Step 6 – Enter Project Start and End Dates > Continue
- Step 7 – Select the correct number of budget periods > Continue
- Click Create Proposal
- eTRACS will navigate to the SetUp Questions page. Instructions are included in red text about the different proposal templates available.
- Scroll down to “Please select a Submission Mechanism/Screen Template”
- Choose “3. Pre-Proposal” from the menu
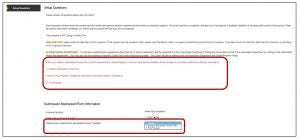
- After choosing the Pre-Proposal template a message window will populate asking for confirmation > Click Ok
- The template will refresh
- Answer the remaining questions on the Set Up Questions Tab
- Is this a Flow Through Project – A “Yes” answer will prompt an additional window pop-up asking for the originating sponsor
- Deadline Type
- Deadline Date
- Deadline Time – Defaults to 5:00 PM EST but can be changed to another EST time
- Associated Departments – See Associated Departments Training Document for guidance
- Associated Centers/Programs – See Associated Departments Training Document for guidance
- Select Program Type – See definitions linked at the bottom of the page.
- The majority of the research will be conducted – Defaults to “On Campus.”
- Note: An off campus rate must be reviewed and approved by central administration and requires an official pre-approval during final proposal development.
-
- Click Save
- The remaining pre-proposal tabs will populate
- Complete the Setup Questions by clicking the “Completed” check box in the upper right-hand corner > Click Ok
- Navigate and complete the following tabs: Personnel, Budget, Abstract/SOW
- Once those tabs are completed, navigate to the Finalize screen
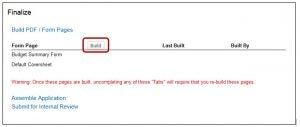
- Click “Build” under the “Build PDF/Form Pages” section
- Click “Build” under the “Assemble Application” Section
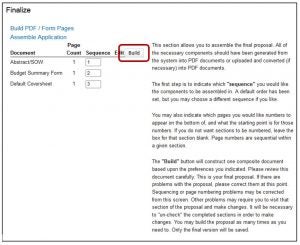
- A PDF compiled of the pre-proposal components will be available under the “Form/Document” sections called “Assembled Doc.” View the assembled document using the glasses icon.

- Because a Pre-Review route is required for all other submissions, eTRACS will first require that you run a pre-review route; NOTE: this route will finalize instantaneously and will not cause delay
- Click Submit for Pre-Review
- A window will pop with a “Final PI Notification” step
- Click Submit
- PI will receive an email that the pre-review route was completed
- Click Submit for Final Review
- Click Submit
- The pre-proposal will now begin its approval route
Developing the Final Proposal – Non Federal
The process to develop the final proposal requires the user to create a new proposal record, but the pre-proposal budget can be copied in to the new proposal record.
- Navigate to the Proposal Development module and click “Proposal” under the Create New section
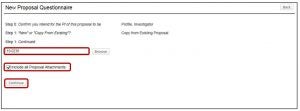
- In Step 1 of the New Proposal Questionnaire, choose “Copy From Existing Proposal” > Continue

- Choose the appropriate pre-proposal record to copy into a final proposal
- Either, leave the text field blank and click the “Browse” button to search for the pre-proposal using different parameters; or,
- Type in the pre-proposal number
- Check the box for “Include all Proposal Attachments”
- Click Continue
- Continue filling out the New Proposal Questionnaire as you would a new and final proposal
- Proposal Type = New
- Create Proposal
- All the data entered in to the pre-proposal will populate in to this final proposal record
- Scroll down to “Please select a Submission Mechanism/Screen Template”
- Choose “1. Generic” from the menu
- After choosing the Generic template a message window will populate asking for confirmation > Click Ok
- The template will refresh
- All the data entered in to the pre-proposal will populate in to this final proposal record
- Develop and complete each tab of the proposal and submit for final routing
Developing the Final Proposal – Federal
The process to develop the final proposal requires the user to create a new proposal record. Only the budget can be uploaded from the pre-proposal record to the final proposal record as the System-to-System forms differ and require the Grants.gov or SPIN ID to be filled out during the New Proposal Questionnaire. There will also be additional questions on the Setup tab.
- See Starting a Federal Proposal training guide to start your final federal proposal
- If the budget from the pre-proposal needs to be copied to the final proposal record from the pre-proposal record:
- Navigate to the pre-proposal record
- Navigate to the budget tab
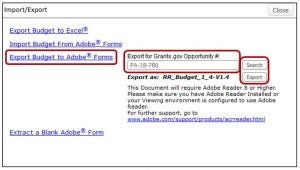
- Click on the Import/Export button in the top right-hand corner

- Click on “Export Budget to Adobe Forms”
- Enter Grants.gov Test Opportunity #: PA-18-780 (or the appropriate Grants.gov opportunity number) > Search > Export
- Save the file that is exported to your documents
- Navigate back to the new federal system-to-system proposal already started
- Navigate to the budget tab
- Click on the Import/Export button on the budget screen
- Click “Import Budget From Adobe Forms
-
Browse for the file > Upload

-
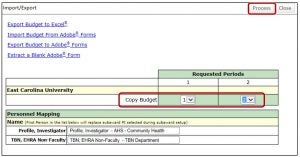
- Copy the desired periods from the uploaded budget with the new final proposal budget by choosing from the drop-down menus next to “Copy Budget”
- Click Process
NOTE: Subawards on the budget will not populate with this process. Subaward budgets can be exported and imported separately in the same way.
- Develop and complete each tab of the proposal and submit for final routing