Help – Adding Awards
- Definitions
- Accepting and Tracking Agreements
- Navigating to the PT Record
- Adding a Newly Funded Award
- Adding a Subsequent Year of Funding
- Adding a Mid-Project Non-Monetary Modification
- Adding a Mid-Project Budget Modification
- Adding a No Cost Extension
- Adding a Supplemental Award from a Supplemental Submission
- Adding an Advance / Financial Guarantee
- Changing the Award Admin Department
- Adding Attachments to the Award
- Adding Compliance Approvals
- Changing Allocation of Credit or F&A Split
- Compiling the Award Packet
Accepting and Tracking Agreements
See “Agreement Tracking” training document for how to track the status and workflow of accepting and negotiating an award.
Any draft agreements or negotiation documentation should be attached in the PT record. Final versions of the complete award packet will be attached in the AT record.
Definitions
New Award: Funding that is being received for a project for the entire project or for the first year of funding.
Proposal Status History: The history of the proposal record and the tab where the status is changed to “Awarded.”
Budget Period Status: The status of each budget period in PT under the Submissions tab. Statuses include:
-
- Proposed: this is the default status after a proposal is submitted and will remain in this status until changed.
- Funded: This status is used to indicate that any award action, increment or period is being processed. Funded should also be used for any non-monetary actions and will be used as a trigger for reporting award actions.
- Anticipated: All budget periods after the initial “Funded” action should be changed to Anticipated.
- Not Funded: Status used for budget periods in a project where the institution is notified of a denial of funding after previous budget periods were already funded.
Mid-Project Modification: Any monetary or non-monetary action in addition to the existing budget periods. Modifications could include: a financial guarantee for a second year of funding, an agreement modification, a budget modification, a no cost extension, a PI change, etc.
Award Increment: Commonly known as an award action, the award increment is any monetary or non-monetary action within a project after it has been funded.
Award Increment Types and Award Increment Detail Types: There are two levels of award increment types. The top level type describes the overarching action taking place and the award increment detail type specifically defines the action. Detailed below is the award increment types with the appropriate award increment detail types that align under each of the award increment types:
-
- New Funding (New incoming funding)
- Initial Funding
- Funding Increment
- Non-Competing Continuation (Typically non-monetary actions)
- Admin Department Change
- Carryforward
- Deobligations
- No Cost Extension
- Non-Financial Modification
- Rebudget
- Personnel Change
- Supplement (Not part of the original proposal)
- Supplement
- Advance/Financial Guarantee (Internally approved pre-award fund)
- Advance/Financial Guarantee
- New Funding (New incoming funding)
Project Dates: Project dates are the dates that cover the entire project from start to finish; includes all award periods within that date range
Award Start and End Dates: Dates of the specific award action or budget period
Award Date: The date that the award was issued or fully executed. The processing date of the award will auto-populate within the award increment tab.
Deobligations: A type of award action that requires a negative dollar award action. See “Deobligation Award Actions” training document.
Navigating to the PT record
A proposal must be awarded from the PT module. The PT module can be accessed from the PD record or after searching for the proposal.
- Option 1: From the PD Record
- Once within the PD record, click on the Management Record (PT) Tab

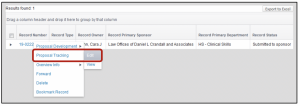
- Option 2: From Search Results
- Searching for the record
- Hover over the proposal number, move the mouse over Proposal Tracking
- Click Edit
Adding a Newly Funded Award
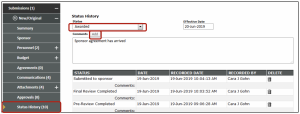
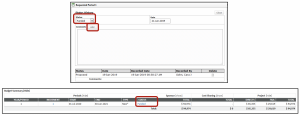
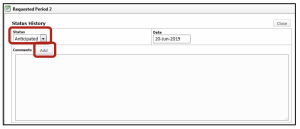
- Navigate to the Status History tab under the submission
- Change the Status to Awarded
- Add comments, if needed
- Click Add
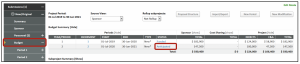
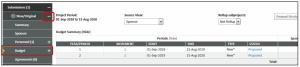
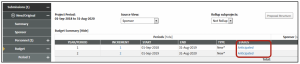
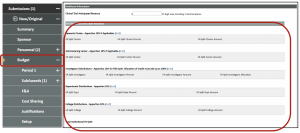
- Navigate to the Proposal Budget tab
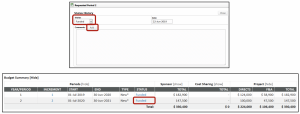
- Change the appropriate Budget Period status to Funded
- Clicking on the word Proposed
- Click Add
- NOTE: Change any subsequent funding period statuses to “Anticipated”
- Change the appropriate Budget Period status to Funded

- If the Budget, Budget Periods, personnel on the project, F&A rate or F&A calculations need to be adjusted:
- Navigate to the budget period, F&A or budget setup tabs
- Adjust as appropriate
- Save

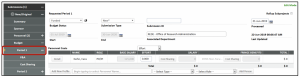
- Navigate to the Summary tab
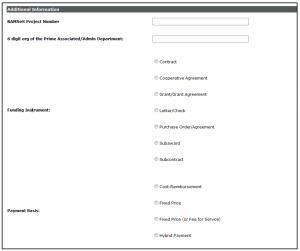
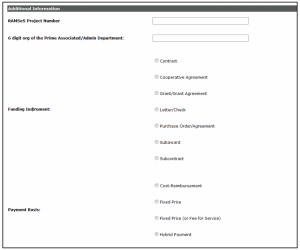
- Scroll down to the Additional Information section

- Enter the following Data:
- RAMSeS Project Number, if applicable
- Full 6 digit org for the Administering Department
- Choose the Funding Instrument
- Choose the Payment Basis
- Save
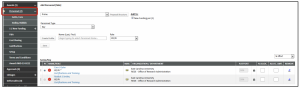
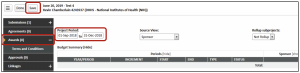
- Navigate to the Awards tab

- Click on the Terms and Conditions tab to add the project terms and conditions
- Click the Add button in the top right-hand corner
- Check the boxes of all the terms that apply and type any additional terms one at a time in the description box
- Save
- NOTE: For more than one miscellaneous Term that needs to be added – Enter those in to the description box and save them one at a time

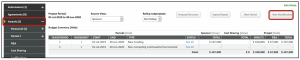
- Navigate back to the Awards tab
- Type in Project Dates
- Save
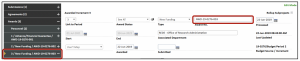
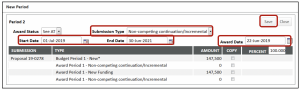
- Click New Period

- In the New Period pop-up box, enter these parameters:
- Award Status = See AT
- Submission Type = New Funding
- Confirm Period Dates/Edit Period Dates
- Enter Award Date
- Check the box next of the first/only award Budget Period to copy the PT budget in to the award
- Save

- The screen will populate with a summary screen displaying the Award Increment and cumulative budget
- Navigate to the Personnel tab
- Change/edit the personnel for this project, if necessary
- Navigate to the New Funding tab
- Enter the Award Number
- Copy the “AWD” number auto-populated by the project
- Add a 3-digit suffix
- For Example: AWD-20-0506-001
- Enter the Sponsor Award Number at the bottom of the page
- Save
- Enter the Award Number
- The funding increment tab will save with the new award number in the name

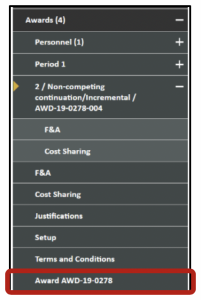
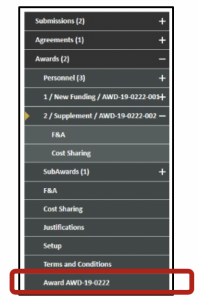
- Navigate to the AT module by clicking on the Award AWD-XX-XXXX tab

- On the Award Summary page:
- CFDA and ID No. will pre-populate from the proposal if applicable
- Click on the Edit icon under the Award increment section

- Change the Award Type to Initial Funding
- Change the Status to Ready to Post to Banner, if it is ready to be sent for Post-Award Processing
- Save
- Add the Sponsor Award Number in the Document Number field

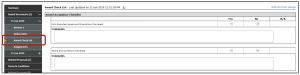
- Navigate to the Award Checklist
- Answer check Yes/No/NA for each of the items
- Save

- After award routing takes place, the fund number can be assigned to the record
- The Award Increment Status should be changed to Posted to Banner
- See “Closing out the record” training document
Adding a Subsequent Year of Funding
- Navigate to the Budget tab under the Submission section in PT
- Change the Budget Period Status to Funded
- NOTE: Any future periods should have already been changed to “Anticipated” when the award was initially processed. Those future period should remain Anticipated until funding is received.
- Click on the word Anticipate
- Change Status to Funded
- Click Add
- Click Close
- If the budget, F&A rate, or F&A calculations need to be adjusted
- Navigate to the specific Period within the Budget tab
- Make appropriate edits to the Budget and/or F&A tab
- Save

- Navigate to the Awards tab
- Click New Period

- In the New Period pop-up box, enter these parameters:
- Award Status = See AT
- Submission Type = New Funding
- Confirm Period Dates/Edit Period Dates
- Enter Award Date
- Check the box next of the Subsequent Budget Period to copy the PT budget in to the award
- Save

- The summary screen will populate displaying the Award Increment and cumulative budget
- Navigate to the Personnel tab
- Change/edit the personnel for this project, if necessary
- Navigate to the newest funding tab and enter the Award Date
- Copy the “AWD” number auto-populated by the project
- Add a 3-diget suffix
- Enter the Sponsor Award Number at the bottom of the page
- Save
- The funding increment tab will save with the new award number in the name
- Navigate to the AT module
- Click on the “Award AWD-XX-XXXX” tab

- On the Award Summary page
- Click on the Edit icon under the Award increment section

- Change the Award Type as to Funding Increment
- Change the Status to Ready to Post to Banner, if it is ready to be sent for Post-Award Processing
- Save
- Add the Sponsor Award Number in the Document Number field

- Navigate to the Award Checklist
- Answer check Yes/No/NA for each item
- Save

- After award routing takes place, the fund number can be assigned to the record
- Award Increment Status should be showing Posted to Banner
- See “Closing out the record” training document
Adding a Mid-Project Non-Monetary Modification
- Navigate to the Awards tab of the PT record
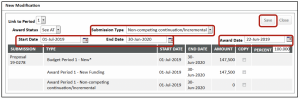
- Click New Modification
- In the New Modification popup box, enter these parameters:
- Award Status = See AT
- Submission Type = Non-competing continuation/Incremental
- Enter the dates of the period in which the change is taking place
- Enter Award Date
- Do NOT copy any of the budget periods
- Save
- The screen will populate with a summary screen displaying the Award Increment and cumulative budget

- Navigate to the Personnel tab – Change/edit the personnel for this project, if necessary
- Unclick the previous award action check boxes
- The personnel change must only occur in the current action
- Add/remove personnel
- Save
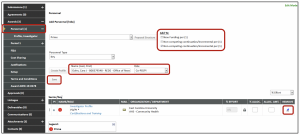
- On the newest Award tab created for this action
- Enter the Award Number by
- Copy the “AWD” number auto-populated by the project
- Add a 3 digit suffix
- Enter the Sponsor Award Number at the bottom of the page
- Save
- The funding increment tab will save with the new award number in the name

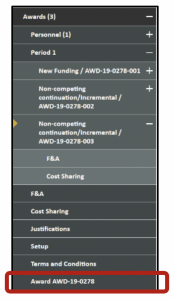
- Navigate to the AT module
- Click on the Award AWD-XX-XXXX tab
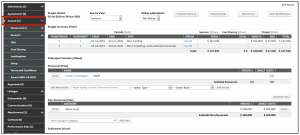
- On the Award Summary page
- Click on the Edit icon under the Award increment section

- Change the Award Type as appropriate
- Change the Status to Ready to Post to Banner, if it is ready to be sent for Post-Award Processing
- Save

- After award routing takes place, the fund number can be assigned to the record
- Award Increment Status should be changed to Posted to Banner
- See “Closing out the record” training document
Adding a Mid-Project Budget Modification
- Navigate to the Awards tab of the PT record > Click New Modification

- In the New Modification popup box, enter these parameters:
- Award Status = See AT
- Submission Type = Non-competing continuation/Incremental
- Enter the dates of the period in which the change is taking place
- Enter Award Date
- Do NOT copy any of the budget periods
- Save

- The screen will populate with a summary screen displaying the Award Increment and cumulative budget
- Navigate to the personnel tab and change/edit the personnel for this project, if necessary
- Navigate to the newest award tab modification in the modification period
- Enter the Award Number
- Copy the “AWD” number auto-populated by the project
- Add a suffix of 3 digits at the end
- Enter the Sponsor Award Number at the bottom of the page
- Save
- Enter the Award Number
- The funding increment tab will save with the new award number in the name

- Within the award tab make the adjustments to the budget categories
- Save
- NOTE: The adjustments should equal $0 if there is no new funding and the modification is only meant to move money across accounts

- Navigate to the AT module
- Click on the Award AWD-XX-XXXX tab

- On the Award Summary page
- Click on the Edit icon under the Award increment section

- Change the Award Type to Rebudget
- Change the Status to Ready to Post to Banner, if it is ready to be sent for Post-Award Processing
- Save

- After award routing takes place, the fund number can be assigned to the record
- Change the Award Increment Status to Posted to Banner
- See “Closing out the record” training document
Adding a No Cost Extension
- Navigate to the Awards tab of the PT record
- Click New Period

- In the New Period popup, set these parameters:
- Award Status = See AT
- Submission Type = Non-competing continuation/Incremental
- Start Date = The start date of the current active budget period
- End Date = New extended end date
- Enter Award Date
- Do NOT copy any of the budget periods
- Save
- The screen will populate with a summary screen displaying the Award Increment and cumulative budget

- Navigate to the newest award tab just created under the period with the new modification
- Enter the Award Number
- Copy the “AWD” number auto-populated by the project
- Add a 3-digit suffix
- Enter the Sponsor Award Number at the bottom of the page
- Save
- The funding increment tab will save with the new award number in the name

- Navigate to the AT module by clicking on the “Award AWD-XX-XXXX” tab
- On the Award Summary page
- Click on the Edit icon under the Award Increments section

- Change the Award Type to No Cost Extension
- Change the Status to Ready to Post to Banner, if it is ready to be sent for Post-Award Processing
- Save

- After award routing takes place, the fund number can be assigned to the record and the Award Increment Status should be changed to Posted to Banner
- See “Closing out the record” training document
Adding a Supplemental Award from a Supplemental Submission
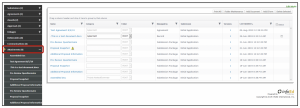
- Navigate to the PT record of the supplemental proposal:
- In the New/Original Summary tab click on Master Record Control to make the supplemental submission a child record within the original submission
- NOTE: See “Master Record Controls” training document
- Both submissions will now appear under the Submissions tab
- In the New/Original Summary tab click on Master Record Control to make the supplemental submission a child record within the original submission

- Navigate to the Supplement submission Status History tab
- Change the status to Awarded
- Click Add

- Navigate to the Proposal Budget tab
- Change the appropriate Budget Period status to Funded
- Click on the word Proposed
- Click Add
- NOTE: Change any subsequent funding period statuses to “Anticipated”
- Change the appropriate Budget Period status to Funded
- If the budget, F&A rate or F&A calculations need to be adjusted:
- Navigate to the specific Period within the tab
- Make edits to the Budget and/or F&A tab
- Save
- Navigate to the Awards tab
- Click New Period

- In the New Period popup window, set the following parameters:
- Award Status = See AT
- Submission Type = Supplement
- Confirm Period Dates/Edit Period Dates
- Enter Award Date
- Copy the PT Budget to the Award
- Check the box next of the Supplemental submission Budget Period
- Save
- The screen will populate with a summary screen displaying the Award Increment and cumulative budget

- Navigate to the Personnel tab and change/edit the personnel for this project, if necessary
- Navigate to the Supplemental funding tab and enter the Award Number
- Copy the “AWD” number auto-populated by the project
- Add a suffix of 3 digits at the end
- Enter the Sponsor Award Number at the bottom of the page
- Save
- The funding increment tab will save with the new award number in the name
- Save

- Navigate to the AT module
- Click on the Award AWD-XX-XXXX tab
- The record will land on the Award Summary page
- CFDA and ID No. will pre-populate from the proposal if applicable
- Click on the Award AWD-XX-XXXX tab
- Click on the Edit icon under the Award increment section

- Change the award type based on the action taking place to Supplement
- Change the Status to Ready to Post to Banner, if it is ready to be sent for Post-Award Processing
- Save
- Add the Sponsor Award Number in the Document Number field
- Save

- Navigate to the Award Checklist
- Check Yes/No/NA for each item
- Save
- After award routing takes place, the fund number can be assigned to the record and the Award Increment Status should be changed to Posted to Banner
- See “Closing out the record” training document
Adding an Initial Advance / Financial Guarantee
- Navigate to the Status History tab under the Submission section of the Proposal Tracking record:
- Change the Status to Awarded
- Add comments, if needed
- Click Add

- Navigate to the Proposal Budget tab
- Click on the plus sign next to the Proposal Development record
- Click on the Budget tab
- Change ALL Budget Increment Statuses to Anticipated
- Click on the word Proposed
- Change the Status by choosing Anticipated in the drop-down menu
- Add comments, if necessary
- Click Add
- NOTE: The first increment/budget period will eventually be changed to Funded once the funding is received from the sponsor
- Navigate to the “Summary” tab
- Scroll down to the “Additional Information” section

- Enter the following Data:
- RAMSeS Project Number, if applicable
- Full 6 digit org for the Administering Department
- Choose the Funding Instrument – this may need to be entered with the NOA is received
- Choose the Payment Basis – this may need to be entered when the NOA is received
- Save
- Navigate to the Award Tab
- Type in the Dates for the Financial Guarantee
- Click Save
- Click “New Period” in the top right-hand corner
- Dates will default
- Submission Type = Advance/Financial Guarantee
- Award Date = The date of the final approval on the financial guarantee form
- Do NOT map budget periods
- Save

- The Award Increment will populate as a new tab
- Navigate to the Increment
- Manually key the award number
- Enter the Sponsor Award Number at the bottom of the page
- Save
- NOTE: Previous award actions are always visible under the Awards tab and the next number in succession should always be manually entered when adding new increments.
- Save

- Within the award tab personnel can be changed on the project and Terms and Conditions added, if needed
- Navigate to the project by clicking on the Award AWD-XX-XXXX tab
- Click on the Edit icon next to the Award Increment

- Change the award type based on the action taking place to Advance
- Change the Status to Ready to Post to Banner, if it is ready to be sent for Post-Award Processing
- Save

- After award routing takes place, the fund number can be assigned to the record and the Award Increment Status should be changed to Posted to Banner
- See “Closing out the record” training document
Changing the Award Admin Department
Navigate to the Proposal Tracking (PT) Submission Summary Screen
- Do this step prior to adding a new period or new modification

- Scroll to the Associated Departments section
- Click Add

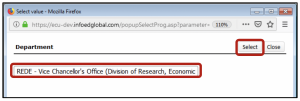
- Typing the department name in the Search Bar
- Choose new admin department
- Click Select
- In the Associated Departments list:
- Designate new admin department as Primary
- Click the radio button in the Primary column
- NOTE: You do not have to delete the old administering department
- Click Ok
- Click the radio button in the Primary column
- Designate new admin department as Primary

- Add the next period or modification (New Period would be used if the project dates are extending at the same time; If only the admin department is changing and dates are not being extended, add the award as a MODIFICATION)
- New admin department will display in the increment summary screen
- Prior award actions will always reflect the original admin department

-
- Navigate to the AT record
- In the AT Summary tab, change the Associate Department field to the new Admin department by clicking on “Set”
- Navigate to the AT record

Adding Attachments to the Award
Attachments to the awards can be done in the PT Attachments tab.
- Before/After adding an award:
- Navigate to the Proposal Tracking module
- Navigate to the Attachments tab
- Browse for the document
- Choose a Category
- Change the Name
- Upload
- See “Document Naming Conventions” training document
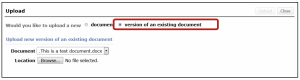
- New versions of existing documents can be uploaded by clicking on Upload version of an existing document and choosing the document to update from the drop-down menu

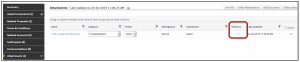
- Previous versions can always be accessed on the Attachments tab under the “versions” column by clicking on the blue hyperlinked number
Adding Compliance Approvals
Compliance approvals should be added on the “Approvals” tab of the PT record of the project. The compliance letter or approval can be uploaded within the approval record. This information can be viewed in the AT record in the Approvals/Linkages tab. See “Adding a Compliance Approval in PT” training document.
Changing Allocation of Credit or F&A Split
If the Allocation of Credit or F&A split needs to changed when the award is initially accepted:
- Navigate to the PT Budget Summary tab and scroll down to the “Additional Information” section
- Change or fill in the amounts for the split and allocation by clicking “Add” or “Edit” next to each section
- Save before adding the first award

If the Allocation of Credit or F&A split needs to be changed mid-project:
- Navigate to the Awards summary tab of the PT record and scroll down to the “Additional Information” section
- Change or fill in the amounts for the split and allocation by clicking “Add” or “Edit” next to each section
- Save before adding a new period or modification
Compiling the Award Packet
Agreement tracking, compliance approvals and all other supporting documentation is attached in the PT record.
- Navigate to the PT record
- Click on the Attachments tab to retrieve any supporting documentation and any agreements previously tracked in the Agreements tab
- If applicable, navigate to the Approvals tab under the specific submission to print compliance approvals saved within the approval record
- View and print the attachment.

- Navigate to the PT Awards Tab
- Click Import/Export

- Click Export Budget to Excel
- All budget periods awarded so far will export – Excel document can be modified to display a single budget period, as needed.

- Navigate to the Communications tab
- Click Record Letter

- A new letter will populate:
- Enter Document Name: AWD-XX-XXX-XXX Coversheet
- Choose Document Category = Award Coversheet
- Choose Letter Template = Award Cover Sheet

- Click Test
- Click Build
- View the coversheet by clicking on the glasses icon

- Compile the attachments and coversheet in to a single PDF
- Route via Award_Routing@ecu.edu